The winds of Internet design have been changing when it comes to avatars: They are increasingly becoming circular.
A number of major social networks have adopted rounded profile pictures, which has spurred this trend on further. The main reason behind it seems to be HTML5. With HTML5, web app developers have a lot more flexibility with how they treat images, and making circular avatars seems to be a “because they now can” option. It’s become quite trendy.
If you love circular avatars but your favorite social site doesn’t offer them, you can create one with Pixlr Editor. Using a simple layer mask to surround your photo with a circular “border,” you can quickly and easily create the effect of a round image. If you’ve never used layer masks before, this is an excellent introduction.
Step 1: Prepare your canvas
I like to start by getting my layers all set up so I can work in an organized way. With the image you want to “circularize” open in Pixlr Editor, unlock the background layer and create a second layer — a new background layer that you will place underneath the layer containing your image. Paint the background of the new background layer white if you want a white background. Leave it transparent if you prefer a transparent background. I painted mine white.

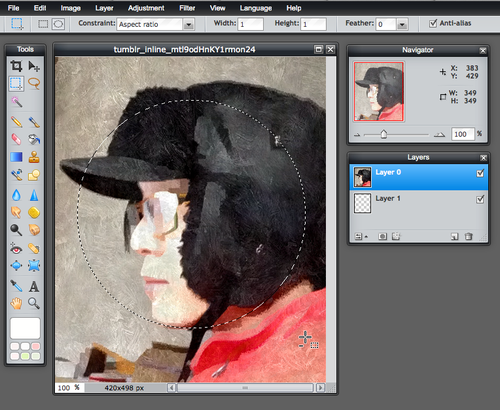
Step 2: Draw your circle
You’re going to draw a circle on your profile image layer. Choose the Marquee tool and select the circular option in additional tools. Note that if you select the constraint for “Aspect ratio” and set that to 1:1 the circle you draw will be completely round. Simply choose a starting point in the upper-left hand of your image and draw the circle. You’ll see it outlined as a selection with dotted lines.
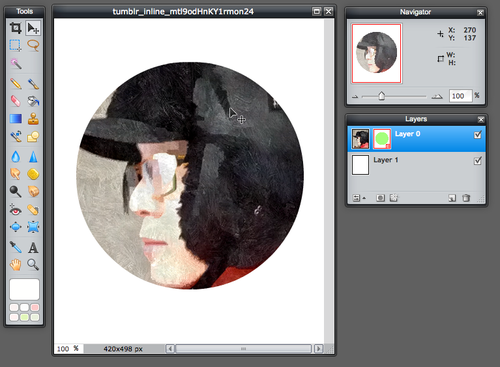
Step 3: Add your layer mask
The area you drew and that is selected is ready to be turned into a layer mask. Choose “Add layer mask” from the Layer menu. You’ll notice that your Layers toolbar now has a green circle on your profile picture layer. You’ll also notice that everything on that layer except the area of the circle you drew has disappeared. You can do a lot with masks like this to cut out or reveal parts of a layer.
Step 4: Clean up your image
You may need to resize your profile picture, and you can do that by choosing “Free transform” from the Edit menu while you have that layer selected. Free transform lets you drag the corners of the layer to resize it (hold down the Shift key to resize the layer with a constrained 1:1 proportion). Once you have your profile picture framed in the circle the way you want it, you might want to crop the entire image so that it’s square. Most social network services will upload a square image, so you might as well make it square now. I added a green background to show you how you can color the background if you want.

And that’s it. It’s quite easy to make an avatar like this and worth learning if you want to develop your layer masking skills further.
Need more help? Try this template
Layer masks can be tricky, so I’ve created a .pxd template to help out if you’re having a hard time getting started. You can Circular Avatar Template. You might want to save a copy of that template to your Pixlr Library so you’ll always have a quick way to make circular avatars.
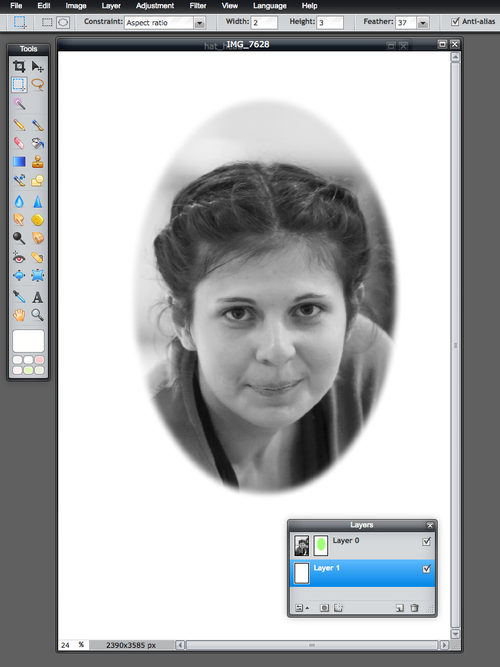
Soft portrait effects, too
You can use this masking technique to put an oval background around a portrait, too. You might want to choose a 2:3 aspect ratio or something similar to give it the right oval look. You also might want to turn up the feathering to get a very soft transition from the photo to a white background. This is a look that you might see in a glamour shot or school photo. Note the feathering setting I’ve chosen: